Two years ago, I was at DevLearn with eLearning Brothers running the camera and audio at the eLearning Rockstars stage. I got to watch presentations from industry leaders who were talking about best practices in course design, learning management, and other awesome topics.
Then John Blackmon got up from Trivantis. His presentation was on how to build a virtual reality course in less than 30 minutes.
“Psh,” I thought. “Yeah right. It probably won’t be real virtual reality, or it’s going to be super lame.”
But then he did it.
Now you could watch the video recording of his session—that’s why I was there two years ago after all. But with the recent acquisition of Trivantis and all of its products by eLearning Brothers, I jumped at the chance to really dive into CenarioVR® and see if it was as easy as John made it look.
It is.
Look, I don’t even have all the fancy tools or virtual reality software that you might think you need to make a VR course. I don’t have a 360 camera, I don’t have a super computer. I have a cell phone and a web browser, and that’s ALL you need.
Here’s How I Did It
Step 1 - Capture the 360 images
 |
 |
As I mentioned earlier, I used my cell phone to do this. I have a Google Pixel 3, which has similar photo options as most other phones, including Panorama mode. However it has another photo mode that I tried out for the first time for this project, called Photo Sphere.
Now I'm sure that Panorama mode may work as well (I haven’t tried it, I have Photo Sphere after all). But this was my first try and this was looking so promising.
Step 2 - Log in to CenarioVR (virtual reality course builder software) and upload the 360 images
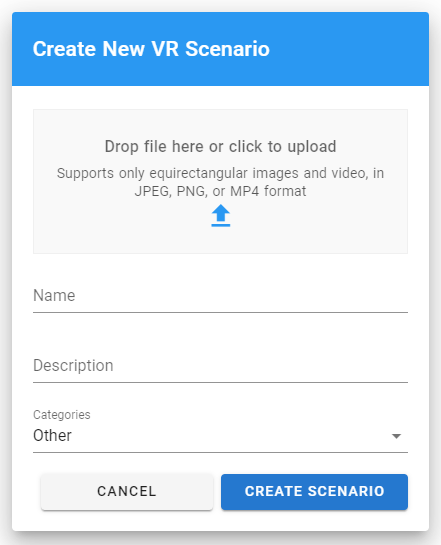
After selecting Create Scenario I was prompted to upload my 360 image. I named my Scenario as well and added a small description. I left the Category at “Other” since this was just me playing around.
Step 3 (Optional) - Play around in the newly created VR space
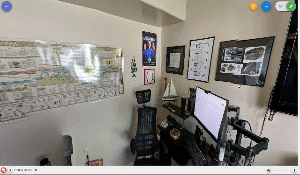
Of the two locations I’d created 360 images of, the first one I played with was my home office. It’s not glamorous, it’s a little messy. I’ve got kids who play in here as well, so there were toys around, snacks, my lunch still on my desk. But it was SO COOL to be able to spin around in the browser and see all of that displayed in fantastic virtual glory.
Step 4 - Start adding content
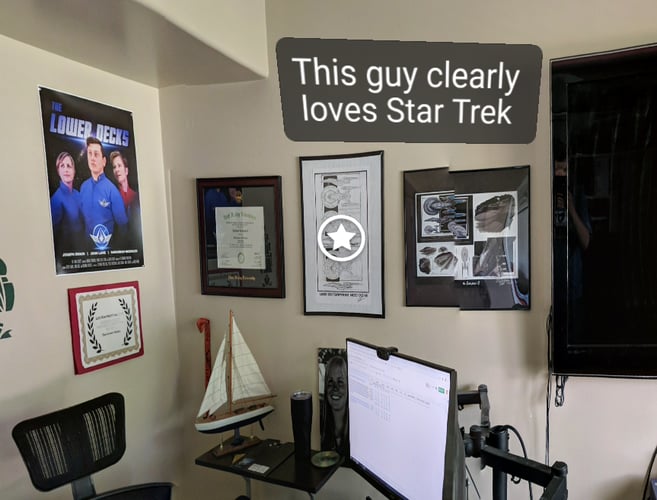
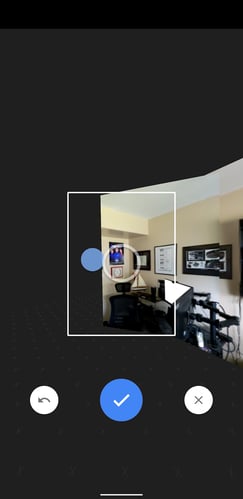
This is where the course really starts to come to life. I was placing hotspots on items that were interesting (sort of interesting at least, it’s just my office) and then creating data cards that would pop up once you clicked on the hotspot. Having the data cards hidden until a click was super easy as well and helped the space not feel cluttered.
There are so many content options to pick from as well. There’s question cards, info cards, audio samples, images, videos, and timers. Overall I played with info, question, image, and video.
Once I felt like I’d put enough information into my messy office space I figured it’d be nice to go outside. So I created a hotspot where the action was to go to another scene.

I put a lot more content into my outdoor scene, including a quiz sort of thing, images of my son, and a video of my neighbor helping me catch a snake. I’m terrified of them so the video is mostly me laughing in hysterical fear as he chases it around before finally catching it in a bucket.
Step 5 - Publish the course
Publish settings are extremely simple and it only took a few moments of poking around to figure out what they all were. Setting the course to “private” means it will only be seen by those who it is assigned to via CenarioVR, so I was able to send it to myself, but I couldn’t share it with my mom. And that was super important for this project. I mean, how else is she supposed to know my office is messy and my backyard’s grass is green for the first time ever? So I set the project to “public” and clicked the “Copy URL” button.
And BOOM! Just like that it was done! I can view the finished product on any desktop computer, I can text the same link to my phone, select the “Cardboard” button in the corner and stick it in my Google Cardboard or similar device and whammo—I’m in fully immersive VR!
So was it really as easy as John Blackmon made it look at DevLearn in years past? YES.
Did it require that I have some fancy 360 camera technology? NO.
Will I be working to develop a VR course that will somehow teach my son to use the toilet? YES.
This is so cool and so easy. My mind is blown.
Taking It To The Next Level
Of course, being an Oculus Quest owner, I really REALLY wanted to get my course running on my fully immersive device. I jumped onto the CenarioVR community and looked up instructions on the install of CenarioVR and tips on how to do that. However I didn’t even need all of those instructions—as an avid Beat Saber player who uses SideQuest to side load apps and mods to my Quest already, it was as simple as installing the Quest/CenarioVR apk to SideQuest and I was good to go!
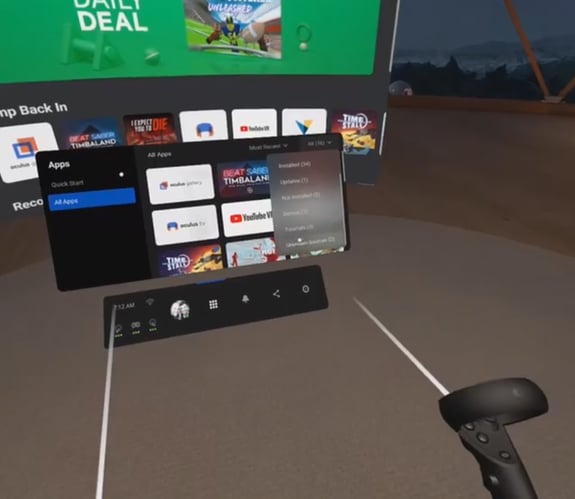
By navigating to my All Apps menu and then scrolling down to “Unknown Sources” (thanks to modding and side loading) it was easy to find the CenarioVR app.
Inside the app (which is gorgeous, by the way) I logged into my account and was able to see the course that I’d assigned to myself.
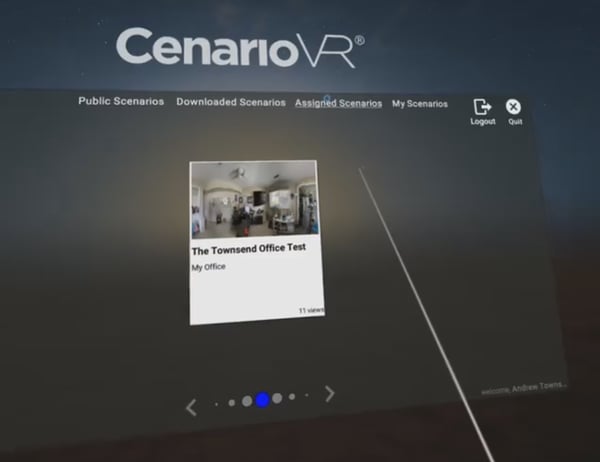
After selecting it and downloading it to my device, I clicked “Launch” and THERE I WAS IN MY OFFICE. Again. I mean I WAS in my office, but now I could SEE my office. Inception. I think you get it.
I did run into one small problem while in the Quest version of my course. One of the images that was in my backyard scene displayed upside down. It did not display that way on the desktop or on the mobile/Cardboard version. After thinking it through for a bit (and talking to one of the developers, lol, I’m not THAT smart), I realized that the image was captured on my cell phone and that because it was landscape and not portrait the metadata on the image was displaying a false “right side up.” I took that image, opened it in Photoshop, and simply resaved it with new metadata. Then the image displayed correctly in my Quest.
I recorded my course as seen in the Oculus Quest. Please don’t judge my office or my backyard too harshly.
Things I Learned
- Obviously, as seen when I opened my course in my Quest, images captured from a cell phone in landscape mode may not have their ups and downs squared away. Could overcome this by figuring out which way your phone is capturing native up and down and just using it that way, or using a different camera.
- When capturing the Photo Sphere, my backyard capture was WAY better because I took more pictures. I took images of the sky, I took images of the ground, and I held my phone a little further from my body because I had space. The stitching still isn’t perfect in areas, but it’s absolutely passable.
- Videos played better/faster when they were smaller. I resized the video of the snake in my yard from 500MB to 100MB and it loads much faster and smoother.
- It’s kind of addicting. You can just keep adding scenes and it never ends! If I’m doing my home I have photos and memories and stories about almost every part of my home and yard so it’s so easy to stick images and info cards all over. Of course, if you’re using this for actual training there’s more of a finite ending. But you might find yourself just endlessly creating on the side for fun. I would argue that that’s an OK problem to have.
- Setting my course to “Public” did make it so I could share it with whoever I wanted, not just the people in my team. However it also made it show up on the “Public Scenarios” list inside of CenarioVR. That might be a concern to keep in mind when you start developing.
All in all, this was so much fun! I’m excited to make more courses, and see virtual reality software continue to rise as a viable tool in the eLearning space! It’s so immersive, and so memorable that any training done in this fashion is likely to be hugely successful.
Want to try CenarioVR for yourself? Sign up for a free trial now.